DesignJet T630 & T650 Print Quality Troubleshooting
19 October 2022
Print quality is something that rears it's ugly head on occasion, so here are some tips if you're suffering from:
- Streaked prints
- Faded prints
- Prints without black or other colours
- Blurry prints
- Fuzzy text prints
- Prints with ink streaks or smears
- ...and more!
1. Use genuine HP inks - as an engineering company I can confirm that this isn't "hype". We often attend site where customers are using third-party inks and having ink leaks, smears or just poor-quality output. Once we swap them back to original HP ink everything works like clockwork again. Sometimes the third-party inks have impacted the printhead and they may have to change this as well which costs them another few hundred pounds.
In short, you can save money on ink with third-party inks but often the repair costs are higher so it's a balance. If the third-party company hasn't got the ink consistency 100% correct then it causes issues e.g. if the atoms of the ink are too small they run through the printhead faster and cause ink leakage and smears and if the atoms of ink are too large they block the printhead, requiring the printhead to be replaced.
Customers have reported on printers where inks have gone EOL (where they HAVE to buy third party ink) that they get through the third-party ink twice as fast as the original HP cartridge and have print quality issues. We're not against third-party ink but unless you have high print volumes then it's often not worth swapping - added to which they normally find their way into landfill whereas HP inks are recycled - and finally third-party ink can affect the air quality and can be damaging to health as they don't have the same controls in place as HP have with their ink which conforms to specific air quality standards.
2. Check the paper - HP advise you need to make sure the paper is appropriate for the print job, so to cover off the basics:
- When you install new paper you need to select the correct setting for it. This tells the printer information such as; how much ink to lay out for optimum printing as well as accommodating the media thickness The front panel will prompt you to select your paper category and type. If you don't see your paper type, touch more paper types. If you still can't find your paper type in the whole list you can use a preset but you must identify if the paper is transparent or translucent, photo or bond, coated or technical.
- If you can't find your paper type: If you're using transparent paper select Film > Transparent/Clear film. If it's translucent or film (eg technical paper) select Film > Matte film. If it's high gloss photo paper select Photo Gloss Paper. For Semi-gloss, Pearl or Luster paper, select Photo Semi-Gloss/Satin Paper. For tracing papers select Natural tracing paper < 65 g/m2 depending upon the weight of the paper. For thin papers less than 90gsm or uncoated papers, select Bond and Coated Paper > Plain Paper or Recycled Bond Paper. For light coated papers less than 110 g/m2 select Bond and Coated Paper > HP Coated Paper. For heavyweight coated papers greater than 200 g/m2 select Bond and Coated Paper > Heavyweight Coated Paper
- Sometimes modifying settings will help resolve some print quality issues e.g. if your black ink is easily removed when touched, then your paper is incompatible with matte black ink so use an optimised ink combination by selecting paper type Photo Paper > Photo Gloss Paper. If your paper is wrinkling or there's too much ink on it you can direct the printer to use less ink by selecting a thinner category. The thinnest is plain paper, followed by coated paper and heavyweight coated paper.
- There are some papers you can purchase that will slip/slide in the machine causing prints to fall outside the optimal printing tolerance of +/- 0.1%. If this happens try changing the paper to HP paper to see if it resolves the issue.
- There are other papers which might not be suitable for your printer - you need to buy paper suitable for water-based aqueous inks - i.e. check if you accidentally purchased a roll of paper meant for UV ink or Solvent ink or Latex ink. You have to purchase paper suitable for aqueous inks otherwise you'll get print quality issues.
- There is also just some media (paper) that appears to fit what you need, but just doesn't work well for whatever reason - perhaps the distributor wrongly allocated it as suitable for aqueous ink but it was if instead a solvent ink paper. If in doubt, purchase HP paper to see if this resolves your issues. Added Note: Cheap paper is particularly prone to high dust content so if you always seem to be servicing your printer, look at the paper you're using as it can be false economy purchasing really cheap paper - there is often a reason why it's cheaper.
3. Check the print settings
Perhaps the print settings are set to print in draft mode - so check and set them to best quality.
- Windows: Open the Window driver and go to the Paper/Quality tab. Adjust Print Quality, Document Size and Margins/Layout
- Mac OS: Open the Mac OS Print dialog and go to the Paper/Quality tab. Adjust Quality Options, Paper Size Format and Margins/Layout
4. Check the environment
Humidity can cause ink to soak into the paper, making the lines blurred and fuzzy. Professionals will often store paper rolls horizontally to avoid different temperatures at each end of the roll for a flawless finish. Also ensure you're operating the printer within HP temperature guidelines i.e. your room must be between 5-40 degrees Celsius (41-104 degrees Fahrenheit). Sometimes the printer won't print at all if the operating temperature isn't correct e.g. in really cold offices we've known the inks to freeze and for customers to have to warm up the room first before printing.
5. Check you are operating the printer correctly to avoid print quality issues - tips from HP
- Always use the Power Button to turn the printer off - failure to power off correctly can cause print-quality issues
- Always replace any missing ink cartridges as soon as possible - which avoids the need for extra ink used to later have to troubleshoot prints and helps avoid damage to the ink system
- Never turn off the printer when the ink cartridges are missing
- Don't use demo plots to check image quality as these are optimized for settings which may not match your scenario. Use instead the following procedure below to print, and then evaluate a print-quality diagnostic report.
6. Check your Print Head
The printhead is a sophisticated piece of kit inside your printer whereby the ink from your ink cartridge makes its way through tubes and into the printhead, which in turn has many thousands of tiny holes or nozzles. The ink is heated up using an electrical charge, which then fires the ink out through the printhead nozzles at high speed, placing the ink precisely on your paper. Over time, the printhead can get out of alignment OR the thousands of nozzles gradually get clogged up(more so if you use third party inks) so the following checks are usually the key to sorting out and resolving any print quality issues.
USEFUL NOTE: The printhead is classed as a consumable item not a spare part - but IF your printer is still relatively new AND it's still in warranty, call HP on 0207 660 0403 to see if they will replace it free of charge under your manufacturer's warranty. Normally though, the printhead falls outside the scope of any support cover and it's something you will need to pay for yourself, as it's treated in much the same way as your ink and paper.
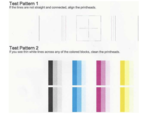
The print quality diagnostic report consists of two test patterns to help check the performance of the printhead i.e. whether it's suffering from clogging or alignment problems. The test patterns are easiest to evaluate on plain white paper but you can use the same paper type that you were using when you detected the problem.
(a) Print off a Print Quality Report
- Check that the selected paper type is the same as the paper type loaded into the printer. (I normally throw around 10 sheets of A4 paper into the paper tray at the back of the printer) and tell the printer that I'm printing from the automatic sheet feeder.
- At the front panel tap on the 'cog' icon - then scroll down the menu and select Reports > Print Quality Report. It takes around 2 minutes to print the diagnostic report and it will provide 2 test patterns
(b) Align the Printhead
If the lines in Test Pattern 1 on the diagnostic print quality report aren't straight and connected, then align the printhead. Precise printhead alignment is essential for accurate colours, smooth colour transitions and sharp edges and text. Load paper - but never use transparent or semi-transparent paper for this process. Be aware that a strong light source near the printer during printhead realignment can affect alignment.
- At the front panel tap on the 'cog' icon.
- Scroll down the menu and touch Printer Maintenance > Align Printhead. This takes around 5 minutes to process.
- Wait until the front-panel display shows the process is complete before using the printer. If the printer can't complete the printhead alignment successfully, you may be asked to clean the printhead and try again.
(c) Clean the Printhead
If any of the colour blocks in Test Pattern 2 on the print quality report show white lines, or are faded or completely missing, clean the printhead. Follow the front-panel prompts and perform all three levels of cleaning if necessary. If the problem remains, try cleaning it again. Cleaning uses ink so clean the printhead only when necessary. Each cleaning stage takes 2 minutes and uses 1 sheet of paper with an increasing amount of ink. After each stage, review the quality of the printed page. Only initiate the next phase of cleaning if the print quality is poor. If print quality still seems poor after completing all stages of cleaning, try aligning the printhead.
- At the front panel tap on the 'cog' icon
- Scroll down the menu and touch Printer Maintenance > Clean the Printhead.
(d) Replace the Ink Cartridge
If the problem remains, replace the ink cartridge corresponding to the streaked, faded or missing colour block in Test Pattern 2. Check the inks and lift them out - if the area which holds the ink cartridges is filled with ink it is usually the case that you need to replace the printhead as well.
(e) Replace the Printhead
If the problem remains, replace the printhead - if it's still in warranty then call HP. To purchase a printhead please email consumables@hpplotter.co.uk. Once you replace the printhead, the printer will automatically perform a printhead alignment on the loaded paper. To replace the printhead, HP also recommends wearing cotton gloves to avoid getting your hands dirty and lock the wheels down to prevent the printer from moving.
- Ensure the printer is switched on. From the front panel, tap the 'cog' icon and select Printer Maintenance > Replace printhead then tap Continue to proceed
- Open the main door. Press each ink cartridge to unlock it and remove all ink cartridges, then tap Next
- Open the printhead latch (blue) and remove the printhead, keeping it vertical to avoid getting ink on the connections.
- Insert new printhead and when finished close the blue latch and tap Next
- Insert the ink cartridges ensuring you insert each ink into the slot that has the same coloured label as the cartridge you're installing if the print head is new, install the NEW ink cartridges (don't throw away your old inks). New inks are required for successful printhead replacement. Close the main door. The front panel recommends a printhead alignment.
- The printer will now prepare the printhead for use - this process takes around 6 minutes.
7. Check the Paper Advance Calibrations
Accurate paper advance is important to image quality because it controls the proper placement of dots on the paper so paper needs to be advanced at the proper distance to avoid light or dark bands appearing on prints or increased image grain. Recalibration takes approximately 2 minutes.
- From the front panel, tap the 'cog' icon, then scroll down the menu and touch Printer Maintenance >Paper advance calibration > Calibrate ready paper.
- Wait until the front panel displays the status screen, then re-print your print. Don't worry about the paper advance calibration image.
- If you would like to fine-tune the calibration (or are using transparent paper) touch the 'cog' icon and select Image quality maintenance > Paper advance calibration > Adjust paper advance. You can correct light banding by decreasing the percentage and dark banding by increasing the percentage and then touch OK to save the value. The adjustment range is from -99% to +99%. Wait until the front panel displays the status screen and reprint your print.
- If you make a mistake on setting the Paper advance settings, you can return to the default calibration by selecting Image Quality Maintenance > Paper advance calibration > Reset ready paper.